How to Build a Choice-Driven Game With JavaScript
Do you love playing video games? Have you ever thought, “I wish I could make one of my own.” Good news, you can! And it’s actually not as hard as you may think. I built a game called Highway Robbery, a choice-driven narrative game about car dependency within the United States that combines historical and cultural situations using just HTML, CSS, and JavaScript.
(It’s pretty fun I think).
Here is a tutorial to inspire you to build something similar.
STEP 1: BUILD YOUR WORLD
The first, and most important step to creating a game is worldbuilding. Every game tells a story. Mario has to save Peach. Steve has to survive long enough to find and defeat the ender dragon. Mike has to survive five nights at Freddy’s. Maybe you have an idea for a game about whatever topic, you need to ask yourself these three questions: What’s my story or argument? What is my aesthetic? What are the stakes and consequences?
Before I even started building the game, I had a core idea: exploring the concept of “freedom” in a car dependent country. That question then boiled down to: Do we really make “choices” when the system gives us one option?
From there, the structure followed pretty naturally. Since the argument was about a constrained choice, or lack of multiple choices, the game itself would be choice-based. Players make decisions, while car dependency over time begins to narrow their choices, as buying and maintaining a car suddenly becomes inevitable. Obviously there is a massive amount of history about the dismantling of public transportation, along with the booming of the auto industry across the country, so I split my story up into three cities and three generations, which made it not only more manageable for me the creator, but more swallowable for you the player. By being able to choose one of three different built out cities, I could really dive into the history that I wanted to uncover, as well as add some cultural nods for each city.
That’s where my aesthetic came to play. I did not want the game to feel like a history lesson, rather I wanted it to feel like life. Every scenario includes a picture or a gif, and a storytelling tone that was lighthearted with the goal of keeping players engaged throughout the game, making them feel as though they were experiencing a 75 year time capsule in New York, Detroit, or LA. I built scenarios about concerts and sporting events, shouted out different hit songs, movies, and famous personas from the year in the scenario to humanize my argument because you probably were not there when the first world series took place, but you can relate to the stress of trying to frantically find parking at a stadium, worried you would miss the first pitch.
That’s what’s at stake: your money and your stress. My game tracks money, frustration levels, and car ownership over time so that at the end of the game the player could see how stressed they were and how much money they spent on the numerous cars they would own over the course of the game. Those numbers are not just fun stats to keep track of your progress, they are narrative devices to entice you to finish the game and understand how much car dependency affects numerous aspects of your real life.
So when you start building out your own game, do not start with code. Start with clarity.
Ok now let’s get into the code though.
STEP 2: BUILD YOUR BODY
Now that you’ve identified the worldbuilding pieces you need for your game, it’s time to start writing your code. Open your coding program and create three files: index.html, styles.css, and script.js.
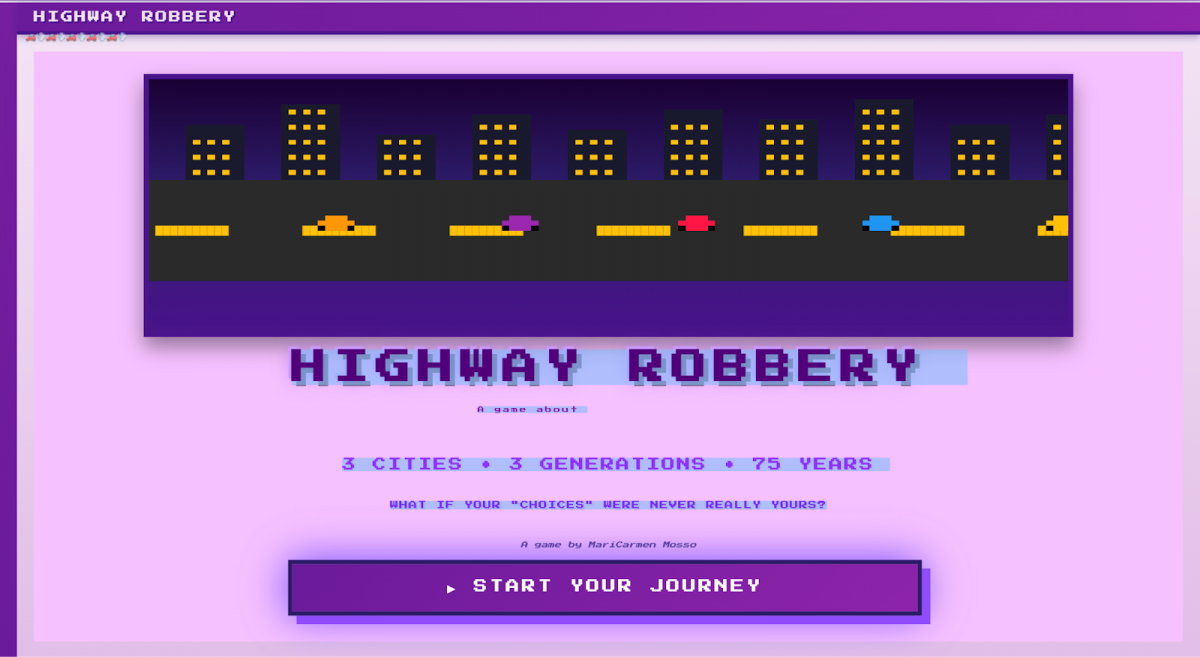
Your index.html file will contain your code for the structure of your game. Think of it as the skeleton, holding everything in place, but not having an affect on look or function. This is where you will build your title screen text, start button, choice containers, stat display, and essentially any other text you want the game to contain that is NOT A SCENARIO. Here is an example of my index.html for my title screen:
   <div id="front-page" class="screen active">
           <div class="front-page-content">
               <canvas id="pixel-canvas" width=1000" height="400"></canvas>

               <div class="title-section">
                   <h1 class="game-title">HIGHWAY ROBBERY</h1>
                   <div class="subtitle">A game about <span id="cycling-word">"choice"</span></div>
                   <div class="game-info">3 CITIES • 3 GENERATIONS • 75 YEARS</div>
                   <div class="game-tagline">WHAT IF YOUR "CHOICES" WERE NEVER REALLY YOURS?</div>
                       <div class="byline">A game by MariCarmen Mosso</div>

                   <button class="start-game-btn" onclick="startCharacterCreation()">
                       ▶ START YOUR JOURNEY
                   </button>
               </div>
           </div>
       </div>
Styles.css is like the skin of your skeleton. This is where you code font, colors, spacing, layout, essentially everything the player experiences visually is controlled here. Every class or id that you declared in your html file, should be styled in css using that same exact name. As you can see, I’m writing my css using classes from my html file. Remember to treat your CSS extremely seriously. It communicates your tone and aesthetic before a player even reads a single word. My game’s css contains lots of shades of purple, square style spacing, and Press Start 2P font for a retro, arcade game aesthetic.
.front-page-content {
   background: #f6c1ff;
   min-height: calc(100vh - 80px);
   display: flex;
   flex-direction: column;
   align-items: center;
   justify-content: center;
   padding: 20px;
   gap: 15px;
}


#pixel-canvas {
   width: 95%;
   max-width: 1100px;
   height: auto;
   max-height: 40vh;
   aspect-ratio: 2.5/1;
   border: 6px solid #4a148c;
   image-rendering: pixelated;
   image-rendering: -moz-crisp-edges;
   image-rendering: crisp-edges;
   display: block;
   box-shadow: 0 12px 24px rgba(0,0,0,0.4);
}


.title-section {
   text-align: center;
   max-width: 1100px;
   display: flex;
   flex-direction: column;
   gap: 8px;
}
Finally, your script.js is the brain. It’s how the game loads scenarios, remembers choices, and keeps track of the consequences. The majority of your game will live in your javascript. My javascript is almost 4,000 lines long because every scenario, every choice, every effect, every result is all stored there. While your HTML builds the structure and your CSS defines the aesthetic and theme, JavaScript is what makes the game interactive and cumulative. Now from this point forward we are doing a deep dive into how the brain of your game will function.
STEP 3: BUILD YOUR GAME STATE OBJECT
So how can JavaScript keep track of everything that happens in your game at any given time? The answer is a game state object. A game state object stores everything that is currently true about your game as it’s being played, so it contains all important information in one structured place. This is extremely critical because without it your game would not be able to remember past decisions made by the player, meaning every choice would be meaningless and consequences would not be able to accumulate. Let me walk you through my game state object.
Character information is in quotation marks because in my game players input their own first name, last name, gender, and choose their job and city. Once they input that information, the gamestate object is able to store and remember that as they play. The currentYear to currentScenarioIndex all start at the beginning and get updated as the game continues, meaning every player starts with the same amount of money, salary, monthly expenses, etc. The hasCarGen1 to hasCar are false to start, but as the game progresses future scenarios may warrant those conditions to become true. Everything that may become true in the game that has to be remembered that will trigger certain scenarios and choices has to be stored in the game state object.
const gameState = {
   character: {
       firstName: '',
       lastName: '',
       gender: '',
       job: ''
   },
   city: '',
   currentYear: 1950,
   currentGeneration: 1,
   money: 5000,
   monthlySalary: 400,
   monthlyExpenses: 85,
   frustration: 0,
   carsOwned: 0,
   currentScenarioIndex: 0,
   hasCarGen1: false,
   movedToSuburbs: false,
   partnerHasCar: false,
   teenHasCar: false,
   livingWithParents: false,
   livingDowntown: false,
   hasCar: false,
   choiceHistory: []
};
STEP 4: BUILD YOUR SCENARIOS
Now that your structure, styling, and game state object are built out and in place, it is time to build the blood and meat of your game: the choice scenarios. Your scenarios will live under a massive JavaScript object which I called const scenarios, but can be called const (whatever you like). This object will store every moment in your game, and can be split and organized however you like, as mine is organized by city and generation. When you first create “const scenarios” you must then define however you are organizing that section, so for example as you can see my code says const scenarios = { detroit: { gen1: [ {. These are called properties, pieces of information stored inside an object. Since this is the block of scenarios for Detroit, I do not have to declare a city again until I’m finished with Detroit, but I do have to declare my generations three times, with gen1, gen2, and gen3. These properties are like “the cells” and allow JavaScript to save, access, and update specific pieces of information reliably and without them your game would not be able to have the structural complexity that makes it feel dynamic and unique.
const scenarios = {
   detroit: {
       gen1: [
           {
   year: 1950,
   title: "Welcome to Detroit",
   narrative: "You just moved to Detroit with $5,000 saved! Your apartment is downtown, $45 a month. The streetcar stops right outside and runs everywhere for a dime. Your partner works three blocks away. There's so much to do and explore. The city feels electric.",
   image: "images/steetcard.jpg",
   fact: {
       text: "In 1950, Detroit had one of America's most extensive streetcar systems. A ride cost 10¢. The city was at its peak population of 1.8 million.",
       link: "https://www.detroithistorical.org/learn/online-research/blog/detroits-streetcars-past-and-present"
   },
   choices: [
       {
           text: "EXPLORE THE CITY BY STREETCAR EVERY WEEKEND",
           effects: { money: -100, frustration: -10 },
           result: "Paradise Valley jazz clubs on Friday - Elvin Jones is just incredible. Belle Isle picnics on Saturday. Fox Theatre on Sunday to see All About Eve - AMAZING FILM. The streetcar takes you everywhere for a dime. Detroit's got 1.8 million people right now and the whole city feels alive. You're living in the center of American manufacturing and it RULES."
       },
       {
           text: "WORK OVERTIME AND STACK THAT MONEY",
           effects: { money: 200, frustration: 25, jobMultiplier: true },
           result: "Time and a half pays SUPER GOOD. Your savings are exploding. You're also seeing your apartment exclusively between the hours of 11pm and 6am. Your partner asks if you remember what they look like. Trouble in paradise...Your friends went to see the Lions beat the Rams but you were doing a double shift. Think of the money...think of the money..."
       },
       {
           text: "BALANCE WORK AND LIFE",
           effects: { money: 0, frustration: 0 },
           result: "You work your 40 hours. No more, no less. Friday nights at the Polish restaurants on Michigan Avenue - pierogis for DAYS. Sundays at Briggs Stadium watching the Lions (they're actually REALLY GOOD right now, absolutely enjoy this while it lasts). Motor City's got you purring."
       }
   ]
},
Each individual scenario also has clearly defined properties: Year keeps track of time progression. Title labels the scenario on the player’s screen. Narrative contains the story text. Image connects a visual of your choice to the scenario and is displayed on the player’s screen. Fact includes historical context. And choices is your most important property as under choice contains text (which show up as the choice buttons), effects (what changes the game state object), and result (the narrative feedback after a choice is made). Your scenarios are structured models that communicate directly with your game state object. The reason they are structured this way is so your storytelling remains extremely clear and readable not only when playing, but when building the game as well. All those properties help make sure that the code you see above, creates this seen by the player:

PSA: remember to close all brackets at the end of your sections.
BUILD YOUR FUNCTIONS
Once the scenarios are structured, the rest of your JavaScript functions as the control systems or the “nervous system” that keeps the game moving. Functions are needed to determine which generation key to load, pull the correct city and generation from the scenarios, swap in specific scenarios, and filter scenes based on stored memory. Every player’s choice updates the game state, adjusting money, frustration, time, flagging specific choices that can unlock or skip certain scenarios in the game if you choose so. The game then re-evaluates the updated data and loads the next valid scenario. Without functions, the game would not load. Just like a body needs organs, blood, cells, all these intricate pieces to work, your game is the exact same way.
function loadScenario() {
   const genKey = `gen${gameState.currentGeneration}`;
   let cityScenarios = [...scenarios[gameState.city][genKey]];

if (gameState.currentGeneration === 1 && (gameState.city === 'detroit' || gameState.city === 'nyc' || gameState.city === 'la')) {
   const jobScenario = gameState.city === 'detroit' ?
       jobSpecificScenarios[gameState.character.job] :
       gameState.city === 'nyc' ?
       jobSpecificScenariosNYC[gameState.character.job] :
       jobSpecificScenariosLA[gameState.character.job];

   const jobIndex = cityScenarios.findIndex(s => s.title === "Job Scenario");
   if (jobIndex !== -1) {
       cityScenarios[jobIndex] = jobScenario;
   }
}
When a generation is complete, the system knows to move onto the next chunk of generation scenarios, carrying over every accumulated variable with it. After seventy five game years, the final results screen is a fully calculated outcome based directly from all the stored financial results, frustration levels, and remembered choices such as how many cars you bought throughout the game. It’s a complex block of code, and almost everything you’ve done, even the create your character you coded back in your HTML, has to be a function in your JavaScript so that the game can continue loading your character with every scenario.
Second block:

       <div id="character-creation" class="screen">
           <div class="card">
               <h2>CREATE YOUR CHARACTER</h2>
               <div class="subtitle">Generation 1: 1950-1975</div>

               <div class="form-group">
                   <label for="first-name">First Name:</label>
                   <input type="text" id="first-name" placeholder="John" maxlength="15">
               </div>


               <div class="form-group">
                   <label for="last-name">Last Name:</label>
                   <input type="text" id="last-name" placeholder="Doe" maxlength="15">
               </div>


               <div class="form-group">
                   <label>Select Gender:</label>
                   <div class="radio-group-horizontal">
                       <div class="radio-option">
                           <input type="radio" id="male" name="gender" value="male" checked>
                           <label for="male">👨 Male</label>
                       </div>
                       <div class="radio-option">
                           <input type="radio" id="female" name="gender" value="female">
                           <label for="female">👩 Female</label>
                       </div>
                       <div class="radio-option">
                           <input type="radio" id="nonbinary" name="gender" value="nonbinary">
                           <label for="nonbinary">🧑 Non-binary</label>
                       </div>
                   </div>
               </div>
function startCharacterCreation() {
document.getElementById('front-page').classList.remove('active');
document.getElementById('character-creation').classList.add('active');
updateCharacterPreview();
}
function updateCharacterPreview() {
const firstName = document.getElementById('first-name').value || 'John';
const lastName = document.getElementById('last-name').value || 'Doe';
const gender = document.querySelector('input[name="gender"]:checked').value;
const job = document.querySelector('input[name="job"]:checked').value;
const genderEmojis = { male: '👨', female: '👩', nonbinary: '🧑' };
const jobNames = { factory: 'Factory Worker', teacher: 'Teacher', public: 'Public Worker' };
document.getElementById('character-sprite').textContent = genderEmojis[gender];
document.getElementById('preview-name').textContent = `${firstName} ${lastName}`;
document.getElementById('preview-job').textContent = jobNames[job];
}
document.getElementById('first-name')?.addEventListener('input', updateCharacterPreview);
document.getElementById('last-name')?.addEventListener('input', updateCharacterPreview);
document.querySelectorAll('input[name="job"]').forEach(radio => {
radio.addEventListener('change', updateCharacterPreview);
});
document.querySelectorAll('input[name="gender"]').forEach(radio => {
radio.addEventListener('change', updateCharacterPreview);
});
function nextScreen() {
gameState.character.firstName = document.getElementById('first-name').value || 'John';
gameState.character.lastName = document.getElementById('last-name').value || 'Doe';
gameState.character.gender = document.querySelector('input[name="gender"]:checked').value;
gameState.character.job = document.querySelector('input[name="job"]:checked').value;
gameState.monthlySalary = jobSalaries[gameState.character.job];
document.getElementById('character-creation').classList.remove('active');
document.getElementById('city-selection').classList.add('active');
}

- How to Build a Choice-Driven Game With JavaScript - April 7, 2026
- Is the US Ready for the World Cup? Our Roads Might Not Be. - December 16, 2025
- Payroll Power: How Spending Tells the Story of Baseball Success - November 6, 2025